
Lego Duplo Intelli Train, Code Bricks, Secrets
http://www.savi-trendblog.de/2012/04/intelli-lok-funktionen-lego-duplo-teil-1/
http://ragun.com/IntelliLok/IntelliLok.htm
Repair: https://www.youtube.com/watch?v=U4LVJLhk-TE
Waschstraße: https://www.youtube.com/watch?v=nVrag0_T9-o
Copy from cavefish.org
Sadly, this brilliant site is down now. Here is a copy from webarchive.
 |
|||||
 |
|
|
|
|
|
 |
 |
||||
Buttons
On the top of the engine there are several buttons. At the rear, the circle and hexagon buttons both can be used to refill either the fuel or oil. Either button has the same result, so they may actually be wired together inside the engine. The large green button can be pressed to make the train start or stop, although it's a bit awkward for small fingers to find while the train is moving. There are two more buttons hidden in the front most pegs of the driver's compartment. These buttons let the engine know if one of the engineers are present. The grey spot between the start and fuel buttons is actually a light even though it looks and feels like a button.


Engineers
The Intelli-Train Engine can tell if either of the engineers are driving and it will behave slightly differently for each of the engineers. For instance, the Red engineer has a hard time getting the engine running and drives slower, wheras the yellow engineer starts the engine immediately and drives quickly. The Intelli-Train Engine determins which driver is in place by the buttons hidden in the front two posts in the cockpit.
Code Bricks
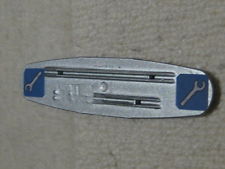
The main way a DUPLO Intelli-Train track is "programmed." The bricks sit between the track rails and can be used to reverse the train engine, cause it to make sounds, and stop it at a variety of station types.


The bricks push on a pair of buttons between the front wheels of the Intelli-Train engine as it passes over the brick. Similar to morris code, the train engine compares the lengths and relative positions of the bars on the code brick to determine which brick it has passed over. For instance, if one button is pressed, then the engine responds to a reverse brick; if both buttons are pressed at the same time, but one is released quickly, then the train responds to a passenger station brick. Each code brick has one full length bar and a second bar that is shorter (or absent entirely, and full length on the reverse and stop bricks respectively). The shorter bar can also be centred with the longer bar or aligned at the right or left end of the long bar. This ingenious system allows the Intelli-Train engine to respond correctly to a code brick even if the train crosses the brick from either direction or at a variety of speeds, because the length of the shorter bar can always be compared to the length of the full size bar. The resolution of the system is very good, as some of the shorter bars are only 12mm different in length from others.
|
Bar (mm) |
Aligned |  |
|
0 |
centred | |
|
12
|
right, left, centred | |
|
25
|
right, left, centred | |
|
38
|
right, left, centred | |
|
50
|
centred |
In the above chart, I've measured the length of the short bar on the code brick and the possible positions for the short bar. The longest bar and empty bar both have only one position relative to the long bar. Adding the positions up, there are 11 possible combinations for code bricks with different short bar positions and lengths. There could be as many as 4 more code bricks that LEGO never released in in the Intelli-Train sets. It's also clear from the bar-graph that there are no missing lengths of code brick short bars, as the sizes of the short bars continue in an even progression without any gaps.
Layout of possible code bricks arranged visually (Thanks, Nick G)
|
Left |
Centred | Right | ||||||||||||||||||||||||||||||||||||||||||||||||
|
|
Reverse |
|||||||||||||||||||||||||||||||||||||||||||||||||
|
Station |
Horn |
Repair Shop |
||||||||||||||||||||||||||||||||||||||||||||||||
|
Train Wash |
Cargo |
Tunnel |
||||||||||||||||||||||||||||||||||||||||||||||||
|
not used |
Octan Fuel |
not used |
||||||||||||||||||||||||||||||||||||||||||||||||
|
Stop |
||||||||||||||||||||||||||||||||||||||||||||||||||
Below is a complete chart with the names and actions of the code bricks including links to the Peeron and BrickLink part pages. Click on a link in the Sounds column to hear a QuickTime recording of the actual engine sounds.
|
Code Brick |
Colour | Peeron BrickLink |
Bar |
Sounds | Notes |
|
Stop |
Trans-Red | 50 mm centre |
toot | the train stops with the toot sound | |
| r-stop | with the red engineer, the train stops with the r-stop sound | ||||
| y-stop | with the yellow engineer, the train stops with the y-stop sound | ||||
|
Reverse |
Trans-Light-Blue | 0 mm centre |
toot | toots, stops briefly, and continues in the other direction; forward / reverse. | |
| r/y-stop | same but with the appropriate stop sound for either engineer | ||||
| Horn | Trans-Pink | 12 mm centre |
toot | toot sound | |
| horn | with the red engineer, the horn sounds | ||||
| horn | with the yellow engineer, the horn sounds three times | ||||
| Cargo |
Trans-Orange |
42392px1 smart004 |
25 mm centre |
toot unload |
the train stops and begins listening for loading or unloading in the cargo car. Loading different coloured crates makes different sounds: Red, Yellow, Green, Blue |
| as above with an engineer, but if no loading happens, then the train will squawk and remain stopped the first time the go button is pressed. | |||||
| Station | Trans-Yellow | 42391px1 smart005 |
12 mm left |
the train stops and begins listening for loading or unloading in the passenger car: Baggage, 1 Passenger, 2 Passengers, | |
| r/y-stop chime (squawk) |
as above with an engineer, but if no loading happens, then the train will squawk and remain stopped the first time the go button is pressed. | ||||
| Tunnel | Trans-Purple | 42889px1 smart006 |
25 mm right |
toot | toot sound |
| echo | with the red engineer, the echo sound twice | ||||
| echo | with the yellow engineer, the echo sound | ||||
| Octan |
Trans-Green |
42394px1 smart007 |
38 mm centre |
the train stops and makes a fueling sound. If a top button is pressed, the fueling sound continues in glugs. | |
| as above with an engineer, but if no fueling happens, then the train will squawk and remain stopped the first time the go button is pressed. If insufficient fuel is added, then the train will slow down and begin to sputter after driving for a while. The fuel lasts approximately 9-10 track lengths per glug of fuel with a maximum of 12 glugs. | |||||
| Wash | ?? | 25 mm left |
toot bubble |
probably for a train wash, as the train stops and makes a bubble sound | |
| r/y-stop bubble (squawk) |
as above with an engineer, but the train is also expecting something to happen in the smart car | ||||
| Shop | ?? | 12 mm right |
probably for a train repair shop as the train stops and makes a air wrench sound. If a top button is pressed, the oil filling sound happens. |
||
| r/y-stop wrench (oil) (squawk) |
as above with an engineer, but if no oil filling happens, then the train will squawk and remain stopped the first time the go button is pressed. If insufficient oil is added, then the train will slow down and begin to backfire after driving for a while. The oil lasts approximately 9-10 track lengths per glug of oil with a maximum of 12 glugs. |
||||
| N/A | 38 mm left |
-- | not used / does nothing | ||
| N/A | 38 mm right |
-- | not used / does nothing |
New Unpublished Code Bricks
Most likely from an unreleased Train Mechanic Shop Set and a Train Wash Set.

The Shop code brick is interesting as it activates a second gauged consumable on the engine; an oil gauge. Like the Octan brick, if the train runs over the Shop brick while an engineer is driving, then the train will expect to be filled up with oil. If the oil gauge reaches zero, then the train begins backfiring and slows until the oil is topped up. Separate gauges are maintained for both oil and fuel, but only one of the two will register as empty at a time. As noted above, the capacity for the oil tank is the same as the gas tank; both are full at 12 glugs. Recently there has been someone selling on eBay what appears to be a code brick modified to match the design of the Shop Brick. That person is calling it a "Repair" code brick.

The Wash code brick stops the train and makes the wash sound, like water bubbling and people talking. If the engineer is driving, then the train squawks and refuses to start the first time the green button is pressed. This behaviour is similar to the Cargo and Station bricks, where the train will at first refuse to move if nothing has been loaded or unloaded. This action makes me suspect that the train is waiting for something to change on another smart-car top piece, similar to the passenger car add-on. Perhaps there is a tanker car top or diner car top. Email me if you can think of a car that better fits the sounds of this brick.

The Smart Car
When the train runs over either the Cargo or Station code bricks, the train begins to listen for changes on the appropriate smart car. However, if loading happens on a smart car that does not match the current code brick, then the train ignores the changes. For instance, the train ignores passengers loading unless it's on the Station code brick. The train will also respond correctly if there is more than one cargo or passenger car being loaded or unloaded. The smart car has two infrared emitters on its sides, so the communication between the smart car and the train engine appears to be like a tv remote, even though there is no obvious infrared receiver on the Intelli-Train engine.
There are eight hidden buttons on the top of the smart car. These buttons are pressed by the cargo bricks, passenger car top, or baggage bricks. There are also a set of 6 smaller buttons that function in groups of three to determine if a passenger is in the cargo car. This makes for 256 possibilities of 8 button pressing combinations, plus the passenger buttons. However, the cargo bricks only cover half of the car at a time, and they can be used in combination. The passenger top covers the whole base of the smart car pressing on 2 of the 4 buttons it covers, leaving four more for detecting baggage. If the unpublished train-car follows the same style, then the possibilities might be as small as 16 combinations on the 4 buttons of one half to the smart car. Here's a chart of the known and unknown possibilities on half of the smart car:
|
Code Brick |
Detail | A | B | C | D |
|
Station |
empty | X | |||
|
Station
|
with baggage | X | X | ||
|
Station
|
baggage, reversed |
X | X | ||
|
Cargo
|
yellow crate |
X | X | X | |
| Cargo | blue crate glass bottles |
X | X | X | |
|
Cargo
|
red crate chicken |
X | X | X | |
| Cargo | green crate tin cans |
X | X | X | |
| ? | X | ||||
| ? | X | ||||
| ? | X | ||||
| ? | X | X | |||
| ? | X | X | |||
| ? | X | X | |||
| ? | X | X | |||
| ? | all | X | X | X | X |
To figure out what kind of communication is happening between the smart-car and the Intelli-Train engine, I built a small infrared detector. I used plans from this site. The detector lets me determine when communication was occurring, but unfortunately it does not include a infrared decoder, so I'm unable to determine what information the smart-car sends.
Even without knowing what is said, knowing when it is said does provide some clues to the workings of the Intelli-Train communication. If the smart-car is empty, then pressing one of the buttons will send a IR signal only after the button is released. If one of the cargo bricks is added to the smart-car, then the car sends an IR signal both when the block is pressed down, and when it is removed. The passenger top also functions similarly. If the passenger top is on the smart-car, then the remaining uncovered buttons will send IR signals both when a button is pressed down and when the button is released. This behaviour may help in discovering the unpublished smart-car function goes with the unpublished Wash code brick.
It's also interesting that once the smart car is used, it begins sending out an IR signal every 5 seconds. Likely this is some sort of "I am here" kind of communication. It's also possible that the car reports it's current button state with every communication. ie; the smart-car could tell the Intelli-Train engine which buttons are pressed and un-pressed each time it communicates with the engine. This might be done by sending a number from 1-256 to the engine; one number for each of the binary possibilities.
The article continues with
Taking Apart & Hacking the Duplo Intelli-Train
Building the New Code Bricks
It's possible to build one of the unpublished code bricks in two ways. The first attempt involved taking a red Stop brick and cutting one of the bars down to the right length. Unfortunately this method did not allow for easy experimentation. Instead these code bricks where built by adding a wooden bar to the Reverse code brick. Using hot melt glue, it is easy to tack the short brick temporarily in place while refraining from doing any permanent damage to the code brick. Later, the short bar can be glued more permanently into position.

The bars can be easily crafted by cutting them out of lengths of a popsicle stick. Although having a sloped face to the bar is important, it's more important to get the length of the top of the bar cut to exactly the right length. Once the bar is tacked in place, it's necessary to test the new code brick by running the train across it from both directions. Slight variations in bar placement can cause the Intelli-Train engine to behave differently as it approaches from either side of the bar.
Disassembling the Intelli-Train Engine
Here is how an Intelli-Train engine can be dismantled, but please don't blame me if you break yours in the process. There are several small and delicate parts inside, and it's quite easy to break them without meaning to.
- Remove the windscreen by snapping it off of the top of the train.
- Unscrew the two captive screws, then remove the battery bay door.
- Take out the batteries and remove the four screws underneath. Also remove the screw at the front of the engine.
- Partially crack open the engine from front to back, along the join between the black and the yellow plastic.
- At the back end, the two parts will remain connected by the two tabs. Insert a thin flat blade screwdriver at the back edge of the bottom of each of the tabs. Pry the tabs with the screwdriver to release the catches on the housing.

- Split apart the halves being careful not to damage any of the components inside. The wire sensors are particularly fragile.
- When removing the innards from the black bottom housing, two of the the battery contacts will need to stay connected to the circuit board so they need to be carefully slipped out of their slots in the battery bay.


Inside the Intelli-Train Engine
The inside of the Intelli-Train reveals some interesting bits about the engine. Pictured below is the gear box and the electric drive engine just visible above the upper gear.

The unpublished shop code brick, activates a new gauged consumable on the train. Both refilling buttons work for adding either gas or oil to the engine, but inside the engine they are labelled "TOOL" and "FUEL." This is further evidence that the unpublished brick was related to a mechanics shop set.


The infrared receiver on the Intelli-Train engine remains a bit of a mystery. It is located at the top of the engine back between the two refilling buttons. There does not appear to be the usual black infrared window for the detector to see out of. Either the buttons are acting as a light pipe to bring the infrared signal to the detector, or the yellow train body itself is translucent to infrared light.
There is a sensor rig on the front axle that counts the distance that the train travels. Brushes ride on the metal axle and twice pre revolution the electrical connection is broken by a plastic bar on the axle. The Intelli-Train engine uses this method to determine how far it has traveled rather than relying on a timer or by measuring the distance using the electric engine or gear box.

Questions Still Remaining
There are still a few things that need to be researched to about the Intelli-Train:
- What smart-car is supposed to interact with the unpublished Wash brick? What is it's pin layout?
- Is it possible to decode the infrared communication between the Intelli-Train engine and the smart-car
- What colours were the unpublished code bricks?
- Is it possible to hack the Intelli-Train engine to add headlight LED's and a tilt shutoff switch?