
[ulltras] Work with a Local ullright Custom Instance
Prerequisites
If you're local ullright instance isn't set up yet, do so now:
http://www.ullright.org/ullWiki/show/setup-a-local-ullright-custom-instance-work
Overview of the Local Development Environment
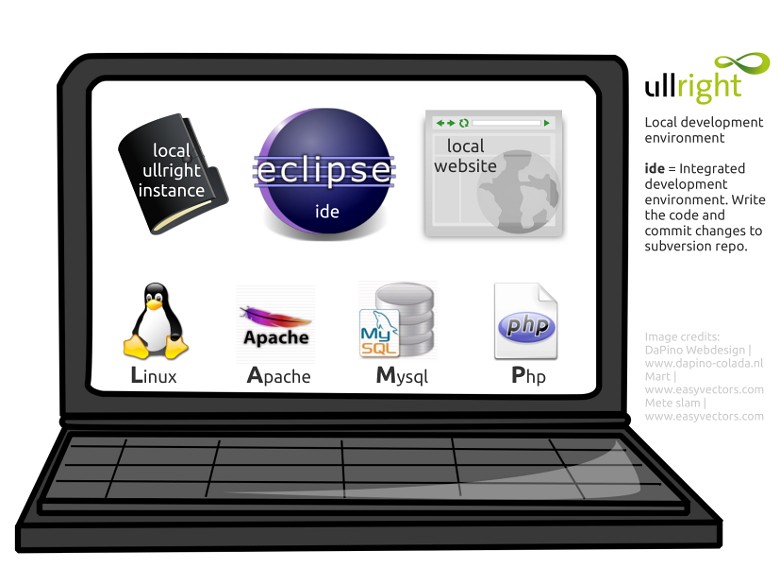
The LAMP-Stack
Lamp stands for Linux, Apache, Mysql, Php. This is the required webservice infrastructure for ullright.
With a locally installed LAMP-Stack you can develop and browse a custom ullright instance directly on your machine. Even offline.
The IDE (Integrated Development Environment)
We recommend to use Eclipse with PDT (PHP Development Tools) and Subclipse as IDE for ullright. It supports very practical features like code completion, syntax highlighting, powerful search capability and a good subversion integration.
Development Workflow the Bigger Picture
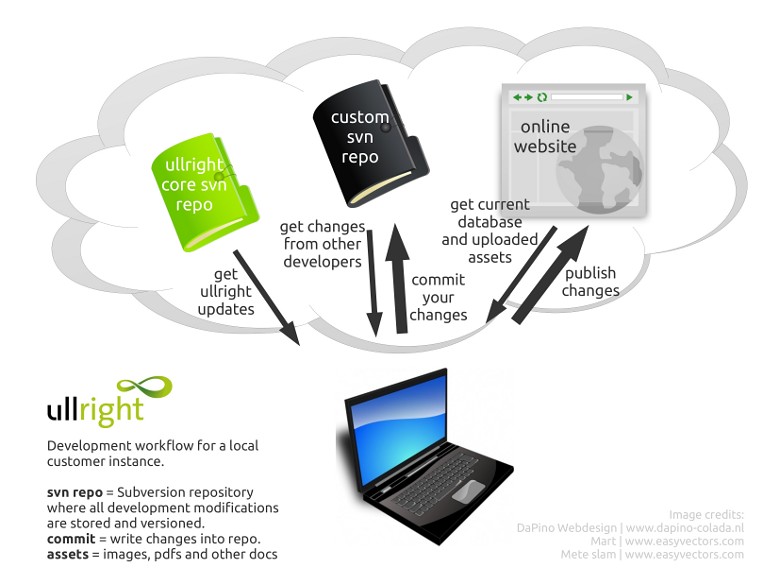
Your ullright development environment is finely tuned to be as simple and productive as possible. Let's examine the components:
The ullright core
First of all every ullright instance needs the ullright core of course. The files are pulled from the ullright subversion repository.
The Custom Subversion Repository
This is where all custom code is safely stored. After each development step you commit your changes to the subversion repository. Each commit is described by a short commit message an a revision number like r142. You can undo changes anytime and nothing ever gets deleted from a subversion repository.
Furthermore subversion is a great way to develop with one or more fellow developers. It is well documented and clear who made which development and when.
The Online Website
Last but not least this is the actual productive website of your ullright instance. You can pull the latest database and assets at will into your local instance. When you finished the development of a feature, you can update the website with the publish command.
The typical Development Workflow with Eclipse
Start your Ubuntu sytem or your virtual machine and open Eclipse.
Eclipse Overview

On the left side you see the file explorer with all your projects. Each local ullright instance is one Eclipse project.
- Right click on a project and select "Open Project"
Open a file or directory by double-clicking on it. A file is opened in the main window, the editor area.
At the top you have the menu as usual. Very practical are the external tools. We'll hear about them later.
Now we'll play through a development cycle.
Update the local instance
It's always a good idea to start with a clean and up-to-date development environment.
- Click on your project in the explorer
- Run "refresh completely" from the external tools dialogue.
- Have a look at the output in the "Console" area at the bottom of the Eclipse workspace.
In rare circumstances errors while upgrading ullright or subversion conflicts can occur. - Click on your project again
- Press F5 so that Eclipse detects the changes.
The "refresh completely" does a lot of things:
- It updates the ullright core files to the latest version
- It gets the latest version of your custom instance from the svn repository.
This is necessary if more than one developer works on this instance - Retrieves the production database data and uploads from the online website so that you can work in the same environment as on the production website
- Performs so called "migrations" which performs mainly database updates like a new tables or columns.
This is a part of updating to the newest ullright core version. - Clears your local symfony cache
Now you have a clean and up-to-date system with the same data as the online site.
Open http://ullright_yourinstance/frontend_dev.php in your browser to see if everything is ok.
Replace yourinstance with the name of your ullright instance.
Develop, Perform your Changes!
You can locate and open files the following ways:
- Navigate trough the explorer tree and double-click on the desired file
- [CTRL] + R Open a resource by filename. Just begin to type the filename and use * as wildcard
For our example open the file /apps/frontend/templates/layout.php.
Now perform a change. For example add a html heading like this:
<body ...>

  <h1>Our test Headline</h1>
Tip: Code completion
- [CTRL] + [SPACE] activates code completion
- Example:
- Write "<div sty" and hit [CTRL] + [SPACE]
- You get a list of suggestions. Use the "arrow down" key to choose "style"
- Now move the cursor between the quotes, write "fon" and hit [CTRL] + [SPACE] again.
- You're now presented a list of valid css attributes that begin with "fon". Choose "font-weight" and hit [ENTER]
- Now hit [CTRL] + [SPACE] again and select a "font-weight" option, like "bold"
Now hit [CTRL] + s to save the file.
Refresh your browser to check if your changes worked as desired.
Tips and Tool for the Browser
We recommend using Firefox with the following add-ons:
- Firebug
The most powerful tool. Press [F12] to enable. Firebug let's you inspect your html markup and css styles very easily. Also great for javascript debugging. - Web Developer
Adds a toolbar to Firefox. Best of: image information, ruler to measure widths and heights, offline html validation. - User Agent Switcher
Great for mobile/reponsive development. Let you simulate an iPhone.
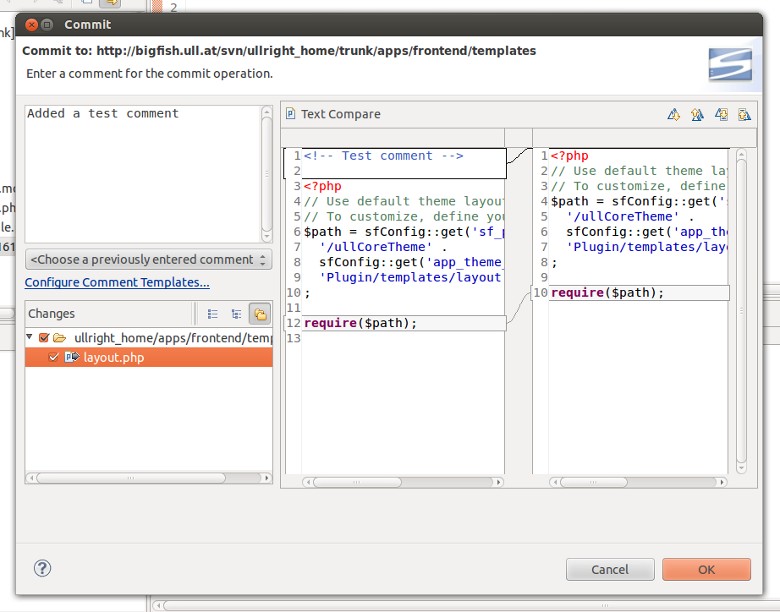
Commit your changes to Subversion
Now that you implemented your changes it's time to safely store them in the subversion repository.
- Click on your project in the explorer
- Press F5 to make sure Eclipse detects all changes.
- Right click on your project (in the explorer) and select "Team -> Commit"
- Enter a good description for your changes
- In the bottom area part you see a list of all changes. Select or deselect files at will.
- Tip: double click on a file to see a graphical text comparison. Very handy to go through your changes and to check if everything is correct.
- Finally commit by clicking "OK"
As a rule of thumb: Commit early, commit often!
Publish
Last but not least: publish your changes to the "real" online website.
- Click on your project in the explorer
- Run "publish" from the external tools dialogue.
- If you're sure you want to publish, confirm with "y" in the "Console" area at the bottom.
Note: that your local developer's database data is not pushed to the production website.
Done! You've now successfully worked through the complete development workflow!
More Tips
Handling of database data
The refresh completely script always overwrites your local database with the database from the online website.
Therefore do all permanent changes to the database on the live website, and call the get "get and load production database" external tool (see below) afterwards.
Rule of Thumb: Everything the customer can edit on the website is database data. Persistend changes have to be done on the live website.
And here are some time savers:
Quick Repository Update
Example: your fellow developer updated a file in your custom svn repo. You just want to grab that update quickly:
- Right click on your project, or a subfolder in the explorer and select "Team -> Update to HEAD"
(HEAD is the newest revision in the repo) - Press F5 to make sure Eclipse detects all changes.
Get Production Database
If you want to grab the actual database of your online website quickly:
- Click on your project in the explorer
- Run "get and load production database" from the external tools dialogue.
Get Production Uploads
If you want to retrieve newley uploaded images or other files do:
- Click on your project in the explorer
- Run "get and load production uploads" from the external tools dialogue.
Quick Publish Only Files
If you have just changed some files you can speed up the publish process as follows:
- Click on your project in the explorer
- Run "publish only files" from the external tools dialogue.
- If you're sure you want to publish, confirm with "y" in the "Console" area at the bottom.
The difference to the normal publish process: No ullright database updates (migrations) are performed.